Introduction
Implementing multifactor authentication is one of the best ways to verify identity and improve security posture. Email OTP is a convenient way to implement another factor using the readily available email system. It allows users to receive, copy, and paste authentication validation codes, into their gateway authentication form, from their email client on any device.
Citrix Gateway supports Email OTP authentication, and can provide authentication for various services including web services, VPN, and Citrix Virtual Apps and Desktops. In this POC Guide we demonstrate using it for authentication in a Citrix Virtual Apps and Desktops environment.
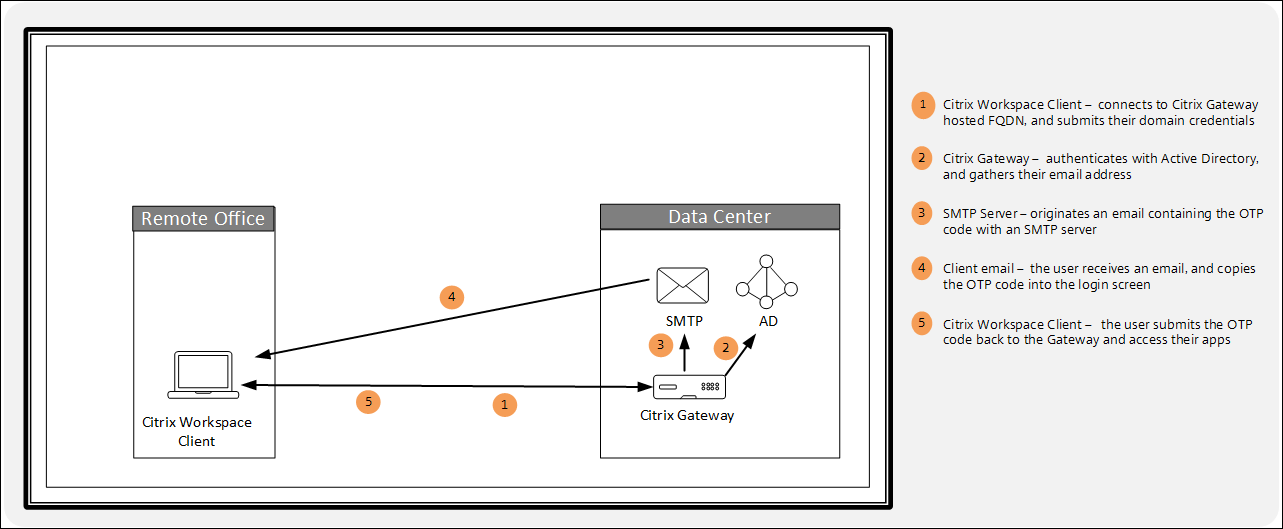
Overview
This guide demonstrates how to implement a Proof of Concept environment using two factor authentication with Citrix Gateway. The guide uses LDAP to validate Active Directory credentials as the first factor and use Email OTP as the second factor. It uses a Citrix Virtual Apps and Desktops published virtual desktop to validate connectivity.
It makes assumptions about the completed installation and configuration of the following components:
- Citrix Gateway installed, licensed, and configure with an externally reachable virtual server bound to a wildcard certificate
- Citrix Gateway integrated with a Citrix Virtual Apps and Desktops environment which uses LDAP for authentication
- SMTP server access with the ability to log in with user name and password to originate emails
- Endpoint with Citrix Workspace app installed
- Active Directory (AD) is available in the environment
Refer to Citrix Documentation for the latest product version and license requirements: Email OTP Authentication
Citrix Gateway
First, we will log in to the CLI on our gateway and enter the authentication actions and associated policies for LDAP and email respectively. Then we will log in to our GUI to build our nFactor flow in the visualizer tool and complete the multifactor authentication configuration.
Authentication policies
We create the LDAP action, and the policy that references it, which is the first authentication factor. Then we create the Email action, and the policy that references it, which is the second authentication factor.
First connect to the CLI by opening an SSH session the NSIP address of the Citrix ADC and log in as the nsroot administrator.
LDAP action
Populate the following fields to create the LDAP action and paste the completed string into the CLI:
-
ldapAction- enter the action name. We enterauthAct_LDAP_eotp -
serverIP- enter the domain server/s FQDN or IP address. We enter192.0.2.50for the private IP address of the domain server in our environment -
serverPort- enter the LDAP port. We enter636for the secure LDAP port -
ldapBase- enter the string of domain objects and containers where pertinent users are stored in your directory. We enter"OU=Team M,OU=Team Accounts,OU=Demo Accounts,OU=Workspaces Users,DC=workspaces,DC=wwco,DC=net" -
ldapBindDn- enter the service account used to query domain users. We enterworkspacessrv@workspaces.wwco.net -
ldapBindDnPassword- enter your service account password. The password is encrypted by the Citrix ADC by default -
ldapLoginName- enter the user object type. We enteruserPrincipalName -
groupAttrName- enter the group attribute name. We entermemberOf -
subAttributeName- enter the sub attribute name. We entercn -
secType- enter the security type. We enterSSL -
ssoNameAttribute- enter the single sign-on name attribute. We enteruserPrincipalName -
defaultAuthenticationGroup- enter the default authentication group. We enterEmail-OTP -
alternateEmailAttr- enter the user domain object attribute where their email address can be retrieved. We enterotherMailbox
Once you have constructed the full string for your environment copy and paste it into the CLI: add authentication ldapAction authAct_LDAP_eotp -serverIP 192.0.2.50 -serverPort 636 -ldapBase "OU=Team M,OU=Team Accounts,OU=Demo Accounts,OU=Workspaces Users,DC=workspaces,DC=wwco,DC=net" -ldapBindDn workspacessrv@workspaces.wwco.net -ldapBindDnPassword your_service_account_password -ldapLoginName userPrincipalName -groupAttrName memberOf -subAttributeName cn -secType SSL -ssoNameAttribute userPrincipalName -defaultAuthenticationGroup Email-OTP -alternateEmailAttr otherMailbox
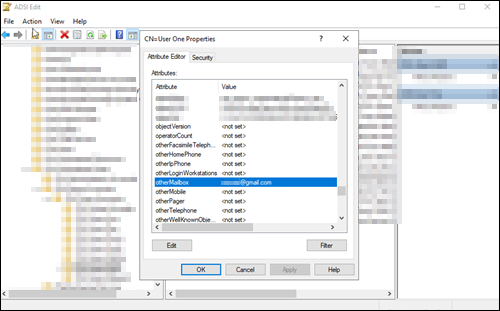
A variety of tools exist that may be used to populate Active Directory user object attributes. For the POC we use ADSI edit, from ‘Server Manager > Tools’, to manually add an email address for user1 to it’s ‘otherMailbox’ attribute.
LDAP policy
Populate the following fields to create the LDAP action and paste the completed string into the CLI:
-
Policy- enter the policy name. We enterauthPol_LDAP_eotp -
action- enter the name of the Email action we created above. We enterauthAct_LDAP_eotp
Once you have constructed the full string for your environment copy and paste it into the CLI: add authentication Policy authPol_LDAP_eotp -rule true -action authAct_LDAP_eotp  For more information see LDAP authentication policies
Email action
Populate the following fields to create the Email action and paste the completed string into the CLI:
-
emailAction- enter the action name. We enterauthAct_Email_eotp -
userName- enter the user, or service account, that will log in to the mail server. We enterworkspacessrv@workspaces.wwco.net -
password- enter your service account password to log in to the mail server. The password will be encrypted by the Citrix ADC by default -
serverURL- enter the FQDN or IP address of the mail server. We enter"smtps://192.0.2.40:587" -
content- enter the user message next to the field to enter the email code. We enter"Your OTP is $code" -
time out- enter the number of seconds the email code is valid. We enter60 -
emailAddress- enter the LDAP object to query for the user email address. We enter"aaa.user.attribute(\"alternate_mail\")"
Once you have constructed the full string for your environment copy and paste it into the CLI: add authentication emailAction authAct_Email_eotp -userName workspacessrv@workspaces.wwco.net -password your_service_account_password -serverURL "smtps://192.0.2.40:587" -content "Your OTP is $code" -timeout 60 -emailAddress "aaa.user.attribute(\"alternate_mail\")"
Email policy
Populate the following fields to create the Email policy and paste the completed string into the CLI:
-
Policy- enter the policy name. We enterauthPol_Email_eotp -
action- enter the name of the Email action we created above. We enterauthAct_Email_eotp
Once you have constructed the full string for your environment copy and paste it into the CLI: add authentication Policy authPol_Email_eotp -rule true -action authAct_Email_eotp  For more information see Email authentication policies
nFactor
- Log in to the Citrix ADC UI
- Navigate to Traffic Management > SSL> Certificates > All Certificates to verify you have your domain certificate installed. In this POC example we used a wildcard certificate corresponding to our Active Directory domain. See Citrix ADC SSL certificates for more information.
-
Next navigate to
Security > AAA - Application Traffic > nFactor Visualizer > nFactor Flows - Select Add and select the plus sign in the Factor box
-
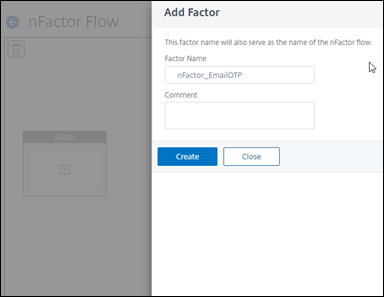
Enter
nFactor_EmailOTPand select create
- Select Add Schema and select Add again next to Select Policy
-
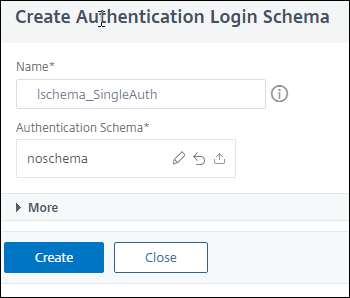
Enter
lschema_SingleAuth - Under Authentication Schema select the pencil icon to edit the schema selection
-
Under Schema Files, select LoginSchema, and navigate to LoginSchema, and select
SingleAuth.xml -
Select the blue select button, followed by Create, followed by OK

- In the same box select Add Policy
-
Select the LDAP policy we created. We use
authPol_LDAP_eotp - Select Add
-
Select the green plus sign next to the
authPol_LDAP_eotppolicy to create a factor -
Enter
factor_EmailThis Factor will use the Email code to perform the 2nd factor authentication - Select Create
- In the same box select Add Policy
-
Select the Email policy we created. We use
authPol_Email_eotp -
Under Goto Expression select
END - Select Add
-
Now we`ve completed the nFactor flow setup and can click Done

Citrix ADC authentication, authorization, and auditing (Citrix ADC AAA) virtual server
- Next navigate to Security > AAA - Application Traffic > Virtual Servers and select Add
-
Enter the following fields and click OK:
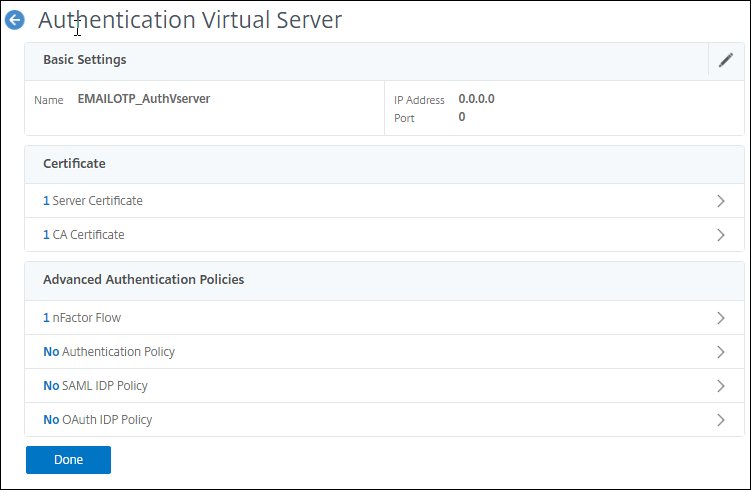
- Name - a unique value. We enter ‘EMAILOTP_AuthVserver’
-
IP Address Type -
Non Addressable
- Select No Server Certificate, select the domain certificate, click Select, Bind, and Continue
- Select No nFactor Flow
-
Under Select nFactor Flow click the right arrow, select the
nFactor_EmailOTPflow created earlier -
Click Select, followed by Bind

- Click Continue, followed by Done
Citrix Gateway - virtual server
- Next navigate to Citrix Gateway > Virtual Servers
- Select your existing virtual server that provides proxy access to your Citrix Virtual Apps and Desktops environment
- Select Edit
- If you currently have an LDAP policy bound navigate under Basic Authentication - Primary Authentication select LDAP Policy. Then check the policy, select Unbind, select Yes to confirm, and select Close
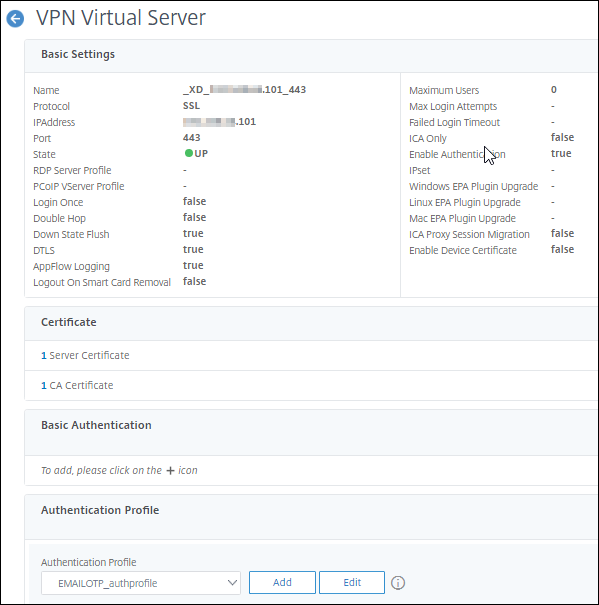
- Under the Advanced Settings menu on the right select Authentication Profile
- Select Add
-
Enter a name. We enter
EmailOTP_auth_profile -
Under Authentication virtual server click the right arrow, and select the Citrix ADC AAA virtual server we created
EmailOTP_Auth_Vserver - Click Select, and Create
-
Click OK and verify the virtual server now has an authentication profile selected while the basic authentication policy has been removed

- Click Done
User Endpoint
Now we test Email OTP by authenticating into our Citrix Virtual Apps and Desktops environment.
-
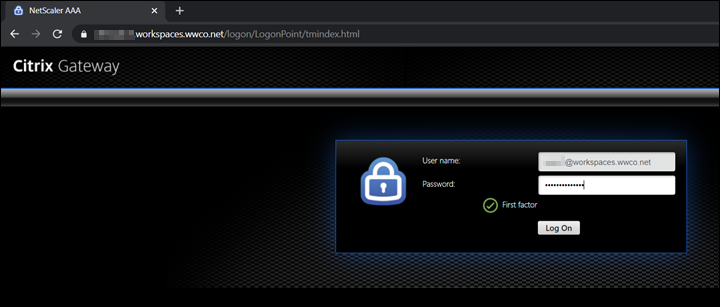
Open a browser, and navigate to the domain FQDN managed by the Citrix Gateway. We use
https://gateway.workspaces.wwco.net -
After your browser is redirected to a login screen enter user userPrincipalName and password

-
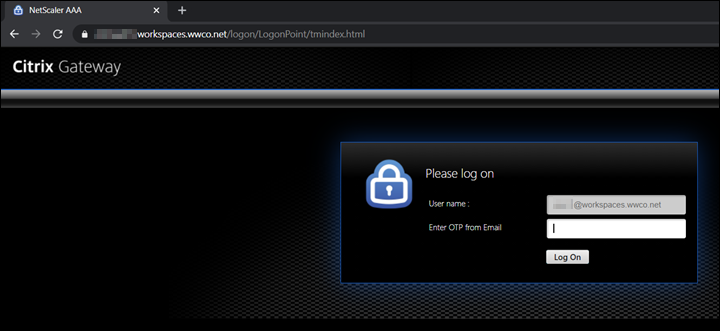
Open the user email client and copy the OTP code

-
Return to your browser where the user name is populated, paste the code, and click OK

-
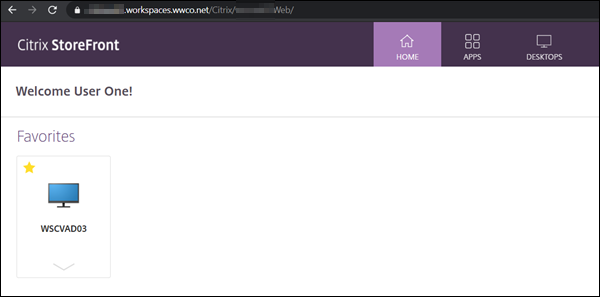
Verify the users virtual apps, and desktops are enumerated, and launch once logged in

Troubleshooting
SMTP server
The Citrix Gateway must be able to authenticate to a mail server with a user name and password in order to originate the client email with the OTP code. If the Citrix Gateway cannot send the email, completion of the first factor will time out after the user submits their user name and password.
-
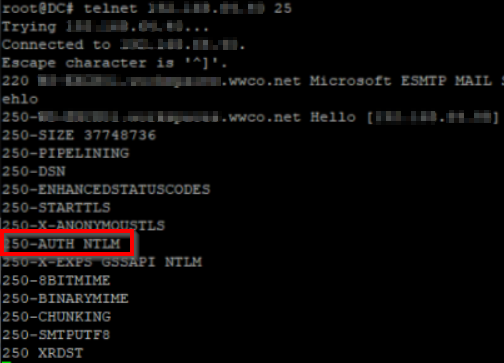
If your exchange server is configured for NTLM only, by default, the Citrix Gateway will not be able to authenticate. The Citrix Gateway must be able to login with a username and password to compose and send an email with the OTP code. To verify, SSH to the Citrix Gateway, or access the console.
-
Enter the
shelland telnet to the mail server TCP port 25. For exampletelnet ipoct1.ipoct2.ipoct3.ipoct4 25 -
Then enter
ehlo. The result should showAUTH LOGINorAUTH NTLM LOGIN. If it does not show
 LOGINfor more information see enable login based authentication on the SMTP server.
-
Enter the
-
You can also use public email servers such as Gmail. When configuring the Email OTP policy enter
smtps://smtp.gmail.com:587in the email server field. However, you must configure your firewalls to allow outbound SMTPS on TCP port 587.
Summary
With Citrix Workspace and Citrix Gateway, Enterprises can improve their security posture by implementing multifactor authentication without making the user experience complex. Users can get access to all of their Workspaces resources by entering their standard domain user and password and simply confirming their identity with Email OTP sent to their email client.
References
For more information refer to other nFactor authentication options:
Email OTP – Email OTP is introduced with Citrix ADC 12.1 build 51.x



There are no comments to display.
Create an account or sign in to comment
You need to be a member in order to leave a comment
Create an account
Sign up for a new account in our community. It's easy!
Register a new accountSign in
Already have an account? Sign in here.
Sign In Now